Payment Plugins
In order to receiving online payment from your users, you will need to config Payment Form to use the payment plugins you want, each payment plugin will work with one payment gateway it is written for. When you install Payment Form, there are 5 payment plugins installed with it by default: Paypal (Paypal payment standard), Authorize.net (AIM), Eway, Moneybookers (Skrill) and Offline Payment.
To access to Payment Plugins management page, there are 3 different ways:
- Access to Components => Payment Form => Payment Plugins
- Access to Payemnt Form Dashboard, then click on Payment Plugins icon.
- On any pages in Payment Form, access to Payment Plugins link in the sidebard

Common Tasks
Uninstall un-used payment plugins
It is very likely that you won't use all of the 4 payment plugins come with Membership Pro out of the box, so you will need to unpublish the one you don't want to use. There are two ways to unpublish a payment plugin:
- Click on the green (published) icon in the Published column.
- Check on the checkbox next to the payment plugin, then press Unpublish button in the toolbar.
Change title of payment plugin
You might want to change the title of the payment plugin to make it easier to understand to your end users. For example, you might want to change the title from Authorize.net to Creditcard....
To change title of the payment plugin, please click on the payment plugin to edit, change the title to meet your need, then press Save button on the toolbar to apply the change.
If your site is a multilingual website and want the title of the payment plugin change depend on the language user uses in the frontend, you need to do some steps below:
- Use a language item for title of the payment plugin. For example, change the title to OS_PAYPAL instead of Paypal
- Go to Payment Form => Translation, press New Item button in the toolbar. Then enter a new language item for the payment method title. Press save
- Translate the new language item which you just created.
Make a payment plugin selected by default
When the subscription form is being displayed, the first payment plugin will be selected by default. So if you want a payment plugin to be selected, you can change the ordering of the payment plugin so that it will be the first plugin on the list and it will be selected by default.
Install New Payment Plugin
Sometime, you will need to use a payment plugin which doesn't come with Payment Form by default. In this case, you might have to purchase these payment plugins at http://joomdonation.com/joomla-extensions/joomla-payment-form.html (if it is available) or develop it yourself (or hire someone to develop it for you). Once you got the payment plugin, you will need to install it. Please follow the step below to install a payment plugin:
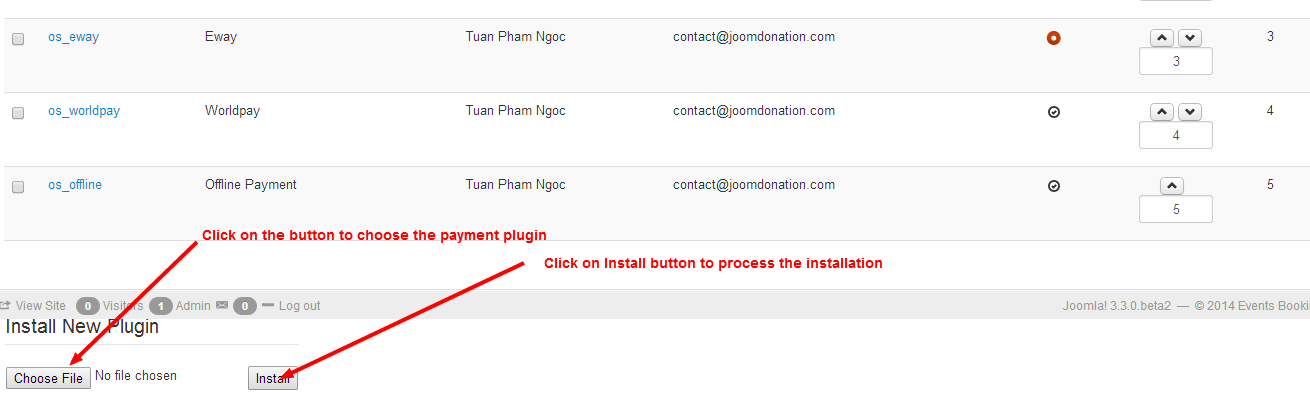
- Go to Payment Form -> Payment Plugins
- Scroll to bottom of the page.
- Click on Choose File button to browse for the payment plugin.
- Click on Install button to process the installation.
Configure Payment Plugins
Paypal
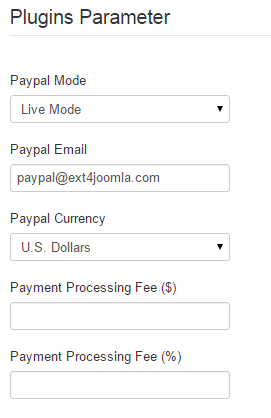
On Payment Plugins management screen, click on os_paypal payment plugin to edit it. The following parameters need to be configured:
- Paypal Mode: Set to Test Mode if you are testing the system and set it to Live Mode when you go live. Please note that if you use Test Mode, you will need to register for a sandbox Paypal account (you could not use your real Paypal account in Test Mode)
- Paypal Email: Enter the Paypal Email associated with your Paypal account.
Authorize.net
On Payment Plugins management screen, click on os_authnet payment plugin to edit it. The following parameters need to be configured:
- Authorize.net Mode: Set to Test Mode if you are testing the system and set it to Live Mode when you go live.
- API Login
- Transaction Key
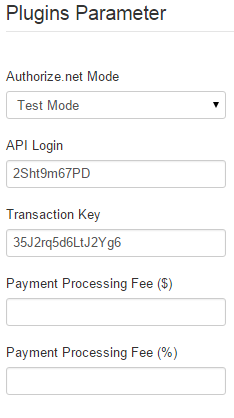
Sometime, your Authorize.net might not work well in Test Mode. But it does works in Live Mode. In that case, if you want to test it in test mode, you can use the following Authorize.net account for testing purpose:
- API Login: 2Sht9m67PD
- Transaction Key: 35J2rq5d6LtJ2Yg6
Eway
If you use Eway payment plugin, you just need to get Customer ID from your Eway account, enter it into os_eway payment plugin parametter and start using this payment plugin.
Offline Payment
Offline payment plugin is a special payment plugin comes with the extension. It allows users to make payment for the form later (not at the time they enter data on the form) by bank transfer, by cash...
When users choose offline payment for the payment, the system will mark the payment status as Pending. It will also display a message which guide users how to make payment.... This guide will also be sent to them via email
After receiving payment from users for the payment, admin will login to backend of the site, click on the payment record, change the status from Pending to Paid.
If you use Offline Payment on your site, please go to Payment Form => Configuration, look at Messages tab, find and change the following messages to meet your need (mostly guide users how to send payment to you)
- User email body (offline payment)
- Thank you message (offline payment).