Configuration
During the installation process, Payment Form will generate default configuration data. However, you should still review all config options and change it to meet your own requirement if needed.
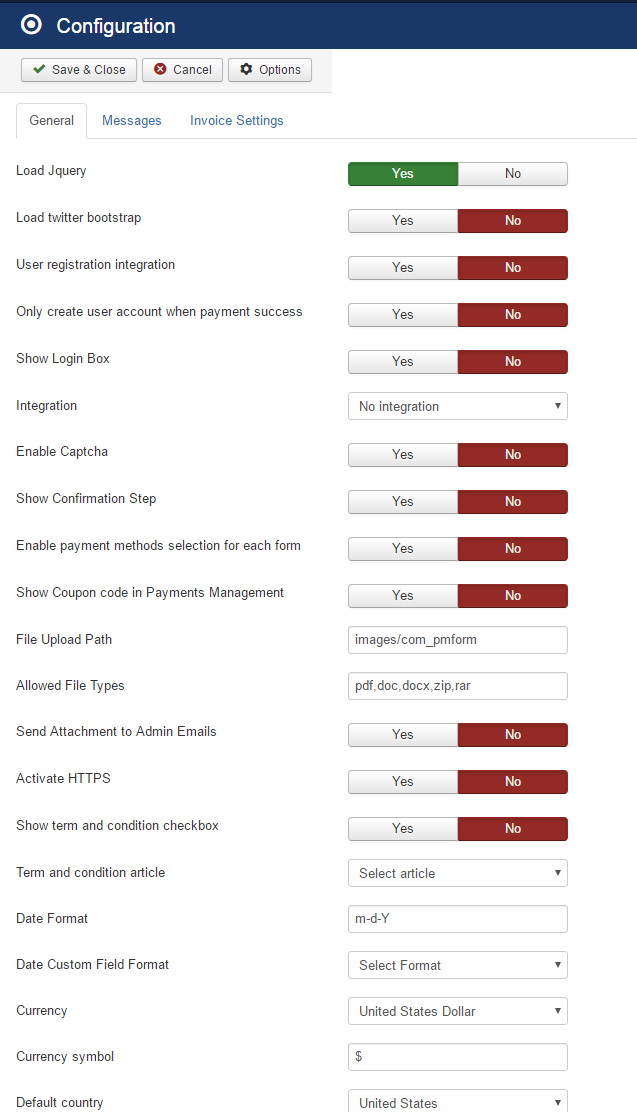
To review and change Configuration, go to Payment Form => Configuration. When you do that, the screen below will be displayed:
To see the meaning of a config option / parameter, you can hover the moose over the name / title of that config option
As most of the config options are very easy to understand, in the section below, we will just explain / review the most importants config options. If there are other options which are not mentioned here and you don't understand, feel free contact us for support. We are available to assist you whenever you want / you need.
General
- Load Jquery: Payment Form requires JQuery library to work. So please only set this config option to No if you are using a template which load JQuery already.
- Load twitter bootstrap: The extension uses twitter bootstrap for front-end layouts. Nowaday, most Joomla templates have twitter bootstrap shipped with it by default, so you should set this config option to No unless your site template doesn't have twitter bootstrap loaded.
- User registration integration: If set to Yes, when users access to a form to make payment, the system will allow them to enter username and password on to register for an account on your Joomla site.
- Only create user account when payment success: By default, Payment Form will create an acccount for users right after they complete entering information on the form (before the payment is processed). If for some reasons, the payment is failed or the user abandon the payment, the account will remain blocked and he could not use that account again if he decides to pay again in the future. If you set this config option to Yes, Payemnt Form will only create the Joomla account for users when the payment record is Paid (after completing payment for or admin approves the payment), it will solve the issue mentioned above. Based on my experience, I would suggest to set this config option to Yes.
- Show Login Box: If set to Yes, on form page, the system will display login box so that existing users can login before continuing the payment process. If you have User registration integration config option set to Yes, you should set this config option to Yes, too.
- Enable Captcha: If you want to use Captcha on Payment Form to prevent spam, you need to set this config option to Yes. As Payment Form uses Joomla core captcha, beside setting this config option to Yes, you need to config Joomla core re-captcha plugin, too. Please see https://docs.joomla.org/How_do_you_use_Recaptcha_in_Joomla%3F for instructions.
- Date Format: Enter the date format you want. It will be used to format the date displaying in the system. For list of supported parameters, please see http://php.net/manual/en/function.date.php.
- Date Custom Field Format: Payment Form allows you to create custom fields to collect more information of subscribers on subscription form. If you use Date custom field, you should change this config option to have the format you want.
- Currency: It is $ by default. If you use different currency, you can change the currency here to meet your own currency. You need to change Currency Symbol, too 10.Term and condition article: If you need your users to accept your terms and conditions to make paymen, please create a temrs and conditions article, then select that article in the config option. When you select an article, the system will display a checkbox (has link to the selected article) and users will have to check on that checkbox to agree on terms and conditions to complete the subscription. Remember to check on Show term and condition checkbox, too
Messages
- From Name: The sender name uses to send emails in the system (to admin and users). If you leave it empty, the From Name which is setup in Global Configuration of your site will be used.
- From Email: The sender email uses to send emails in the system (to admin and users). If you leave it empty, the From email which is setup in Global Configuration of your site will be used.
- Notification emails: The emails you want to receive notification when someone makes payment on your site. If you want to user multiple emails, separate these emails by comman. For example: paypal@joomdonation.com,acounting@joomdonation.com
- Admin email subject: Subject of the notification email sent to admin when someone make payment.
- Admin email body: Message of the notification email sent to admin when someone makes payment.
- User email subject: Subject of the confirmation email sent to user after he makes payment.
- User email body: Message of the confirmation email sent to user after he makes payment using online payment methods such as PayPal, Authorize.net...
- User email body (offline payment): Message of the confirmation email sent to user after he makes payment using offline payment method(s).
- Payment approved subject: Subject of the notification email sent to user when admin approve his payment record (change Published from No to Yes, usually when he uses offline payment method)
- Payment approved body: Message of the notification email sent to user when admin approve his payment record (change Published from No to Yes, usually when he uses offline payment method)
- Form Message: Message display above form when users access to the form to make payment
- Thank you message: The message display to users after they complete payment on a form
- Thank you message (offline payment): The message display to users after they complete payment on a form using offline payment method. Usually, this message will contains instructions to guide user how to make payment to you (for example, transfering payment to your bank account...)
Invoice Settings
- Activate Invoice Feature: If you want to send invoice PDF to your customers after they complete payment, please set this config option to Yes.
- Send invoice to customers: Set this config option to Yes if you want the system to send PDF invoice to users in the confirmation email they received after completing payment. If you set to No, users will have to access to payment history page to download the invoice. This config option should be set to Yes if you use invoice feature.
- Invoice Start Number: If you want the invoice number in the system to start with a certain number (instead of starting by 1), you can enter that number into this config option.
- Invoice Format: Payment Form generates default basic invoice format when you first install the extension. You should review and change the invoice format to meet your need (at least you will have to change invoice logo)